
Multi-Room Availability
Run two or three treatment rooms in parallel. Two settings — rooms per day and hands-on time per appointment type — and Daobook staggers your online bookings, shows each room as its own lane, and tints the lane you can't start in yet.
Multi-Room Availability
If you needle one client while another rests in the next room, Daobook can book that way too. Two settings — how many rooms you run each day, and how long you're hands-on in each appointment type — and your online booking page starts offering staggered starts, your calendar splits each day into room lanes, and a soft tint shows the minutes you can't start anyone new.
The example clinic in the screenshots runs two rooms on Mondays with 45-minute follow-ups and 15 minutes hands-on. Yours will differ; the mechanics don't.
First — What a "Room" Is
A room in Daobook is an availability lane, not a space on a floor plan. It's your way of saying "I can have this many clients in treatment at once". Two things follow:
- Rooms are numbered and the numbering is fixed. Room 1, Room 2, Room 3 — you can't rename them or tie them to a physical room. Room 1 is your first lane every day.
- It isn't room hire. If you rent rooms to other practitioners on fixed sessions with changeover gaps, run that separately. This is for your own diary, and for anyone treating alongside you.
Step 1: Set How Many Rooms You Run Each Day
Go to Settings → Working Hours. Each day's row has a Rooms field next to its hours.

Set 2 or more on the days you run rooms in parallel and leave 1 on the days you don't, then save. Days can differ — if a receptionist turns rooms around for you on Thursdays, that might be your only three-room day.
Step 2: Give a Room Its Own Hours (Optional)
Once a day is set to 2 or more rooms, a Room hours section appears under it. Use it when an extra room isn't yours for the whole day — you only have it in the mornings, say, or you share it after lunch.
Click Add room hours, choose the room, and set the window it's open. A room with no entry stays open all day, so you only add a row for the rooms that open late or close early.
- Room 1 isn't in the list, deliberately. Room 1's hours are the day's hours at the top of the row. To open Room 1 later or close it earlier, change the day itself.
- This narrows a room; it doesn't take it out. To pull a room out for one day, use an unavailable block (Step 10).
- Outside its window a room's lane shows grey on the calendar, and online booking won't place anyone in it.
Step 3: Set Your Hands-On Time
Go to Settings → Appointment Types and open the type you overlap — usually your acupuncture follow-up. Under Scheduling & Pricing, click Set hands-on time — enables staggered booking for multi-room clinics and the hours and minutes selectors open.
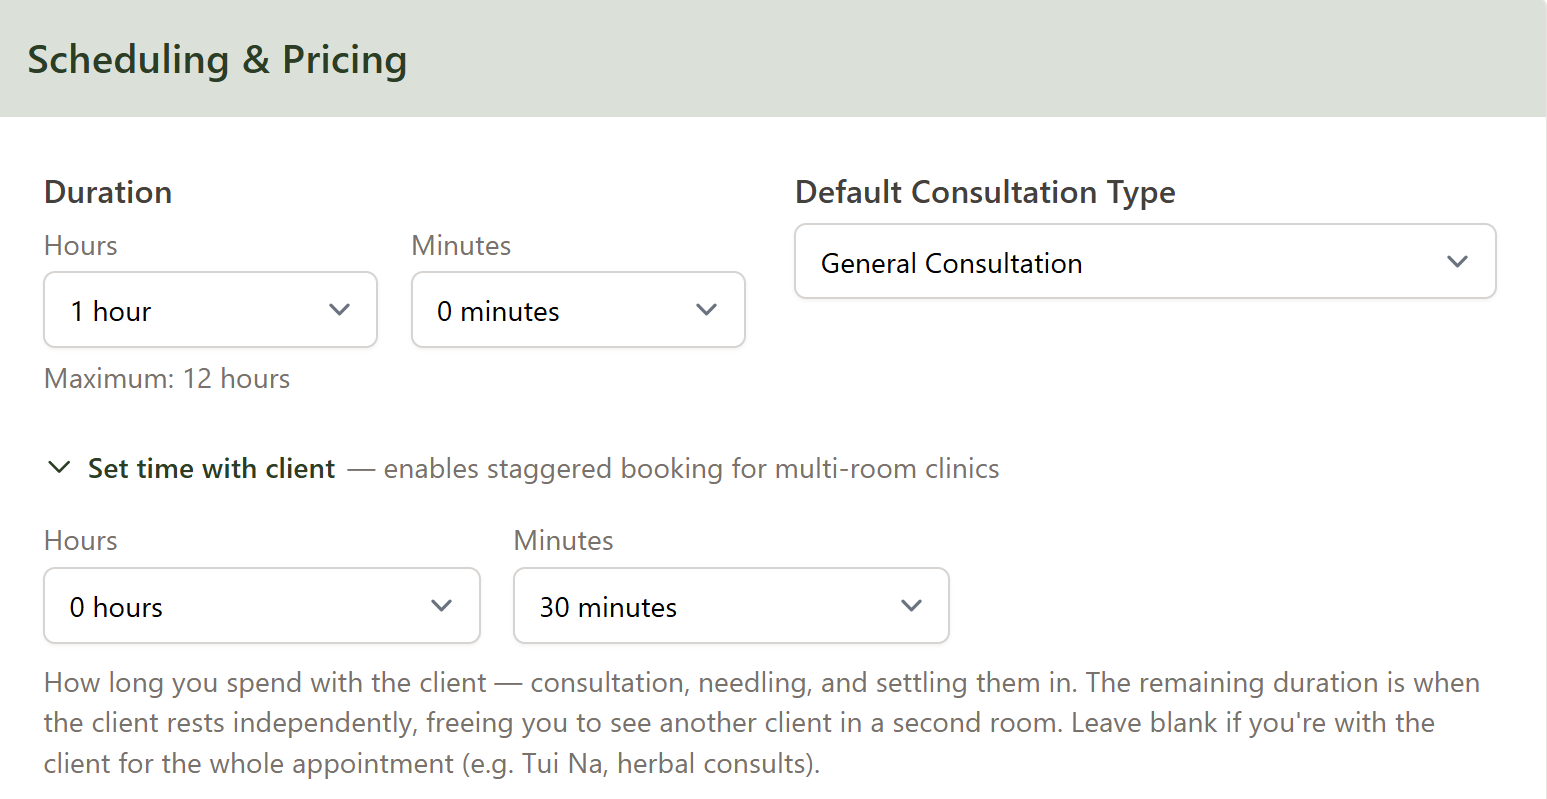
Enter how long you're actually with the client — the check-in, the needling, settling them. The rest of the appointment is the rest phase, when you're free to start someone in another room. For a 45-minute follow-up where the needles stay in for half an hour, that's 15 minutes.
Leave it blank for types where you're with the client throughout — Tui Na, herbal consultations, cupping. Those count as hands-on for their whole length and never overlap.
Choosing Numbers That Stack
Your hands-on time is the clinic's rhythm — the gap between one client starting and the next. Two rules keep the rhythm clean:
- Hands-on time no more than half the appointment length. Any more and nothing can overlap: when the first client's needles come out, you'd always be mid-needling the next. Daobook then correctly books everyone one after another in Room 1, and the extra rooms sit idle.
- Appointment length an exact multiple of the hands-on time. Needle-out moments then land between one needling and the next, and starts tick along evenly. 45 minutes with 15 hands-on offers a start every 15 minutes; 45 with 20 wobbles.
| Appointment length | Hands-on time | A start every… | Rooms to run it flat out |
|---|---|---|---|
| 45 min | 15 min | 15 min | 3 |
| 50 min | 25 min | 25 min | 2 |
| 60 min | 30 min | 30 min | 2 |
| 60 min | 20 min | 20 min | 3 |
| 75 min | 25 min | 25 min | 3 |
| 90 min | 45 min | 45 min | 2 |
| 90 min | 30 min | 30 min | 3 |
If a type doesn't stack — a 45-minute follow-up with 25 minutes hands-on, say — change one number, not both: make it 50 minutes long, or keep 45 and trim hands-on to 15.
Mixing services on the same day? Give every type you overlap the same hands-on time, and make each length a whole multiple of it. On a 15-minute rhythm, 45-minute follow-ups and 60-minute initials interleave whoever books first. Mixing rhythms (a 60/30 type beside a 50/25 one) is allowed, but the mismatched needle-out moments carve dead gaps into your day.
Step 4: What Your Clients See
With both settings in place, your online booking page offers a start at each hands-on boundary that has a free room.
Example: 45-minute follow-up, 15 minutes hands-on, 2 rooms. One client books 9:00 in Room 1.
- 9:00 — taken; you're needling in Room 1
- 9:15 — offered; the first client is resting, Room 2 is free
- Once 9:15 is booked, both rooms are in use until 9:45, when Room 1 empties and the next start is offered there
The list leads with tidy times — on the hour, the half-hour, and starts that pack flush against existing bookings — rather than every mathematically possible minute. As the day fills, new flush starts surface on their own. Capacity is never lost; it just isn't all shown at once.
Step 5: See Rooms on Your Calendar
Open Appointments on a single practitioner's calendar, on a day with 2 or more rooms.
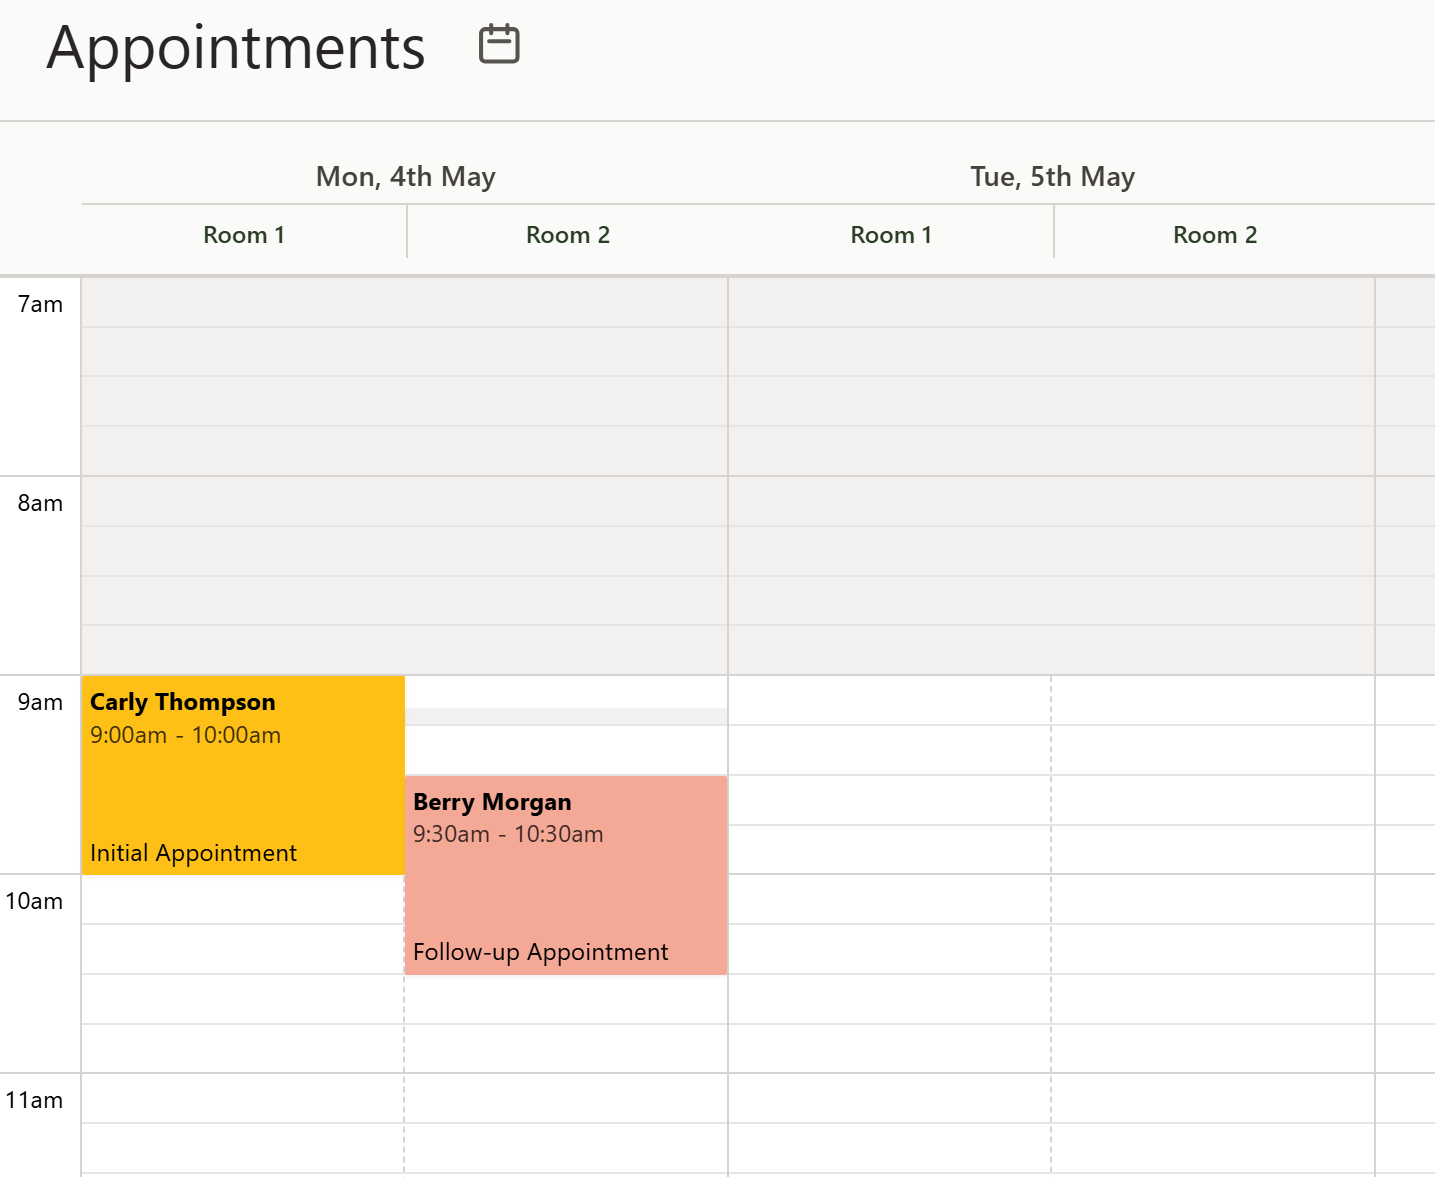
- Room 1 / Room 2 headings sit under the date
- A dashed line splits the day into lanes, so it reads differently from the solid day borders
- Overlapping appointments sit side by side, each in its room
The all-practitioners view keeps its compact layout without lanes. Drop into one practitioner's view when you want to see who is in which room.
Step 6: See Your Hands-On Time on the Calendar
Lanes show where everyone is. Two cues in Settings → Calendar Display, under Hands-on time (multi-room), show when you're free to move. The section only appears once someone in your clinic runs a day at 2 or more rooms.
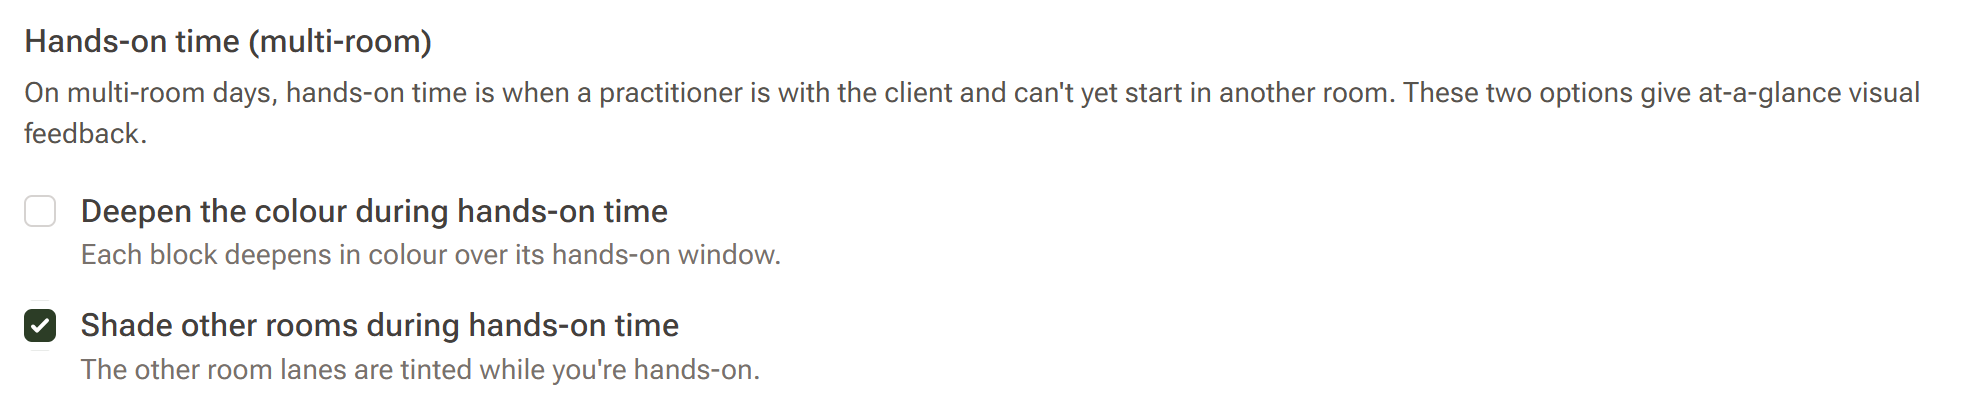
Shade other rooms during hands-on time (on by default)
While you're hands-on with a client in one room, the other room lanes take a soft wash of that appointment's own colour for those minutes. It clears again the moment the client is resting. Hover a tinted stretch and it says You're hands-on here.
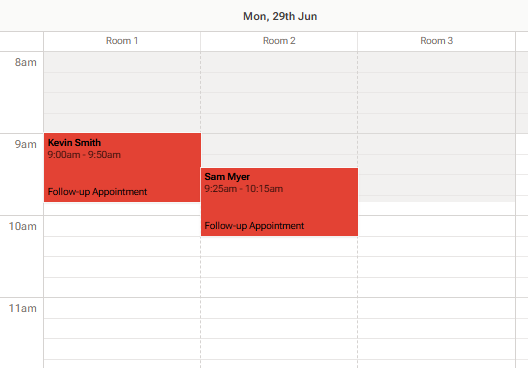
The tint is a reading of the lane, not a closure. It's still open — you can still click into it and book — it just tells you that a start here would land another client's needling on top of this one. That is exactly the window online booking protects, so the tinted stretches are why a lane that looks empty isn't offered to clients at that time.
So a multi-room day reads at a glance: a plain lane is a free start, a tinted lane is a start you'd want to avoid, and grey means only one thing — the room is closed (outside its hours, a break, or an unavailable block).
Deepen the colour during hands-on time (optional)
The second cue works on the appointment blocks rather than the empty lanes. Switch it on and each booking deepens in colour across its own hands-on window, then lightens for the rest phase — so you can read how far into needling each client is straight off their block.
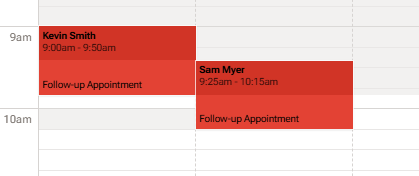
The two cues are independent — run the tint alone, add the deeper blocks, or turn both off. Types with no hands-on time set (massage, herbal consults) read as hands-on for their whole span, which is right, because you're with that client throughout.
Step 7: Book by Hand
Booking by clicking the calendar works exactly as it always has. On multi-room days the appointment type list carries the numbers you need to reason about the stagger — Follow-up Appointment (45 min · 15 min hands-on) — and nothing more.
Manual booking is never blocked. Online bookings follow the stagger rules; on your own calendar you can always overrule them. To see where a service fits before you commit, use Openings.
Step 8: Openings — Every Place a Service Fits
Pick a service and Openings previews every start it could take that day, each drawn as a green box in a free lane. It earns its keep on a packed multi-room day, where the stagger makes the gaps hard to eyeball; on a quiet day it confirms what you can already see.
It's off by default: switch on Settings → Calendar Display → Show openings. That adds a + beside the Appointments heading, on your view only.
Click the + and pick a type — you choose the service before the time.
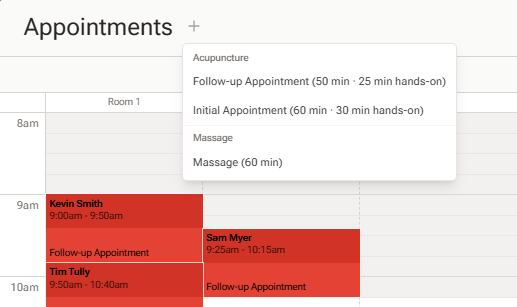
The + becomes an Openings · … chip naming the service you're placing, and green previews fill every start the service fits, each in a room free to take it. Closely spaced starts tile into strips, and near-duplicate times (10:55 and 11:00) collapse to the rounder one.
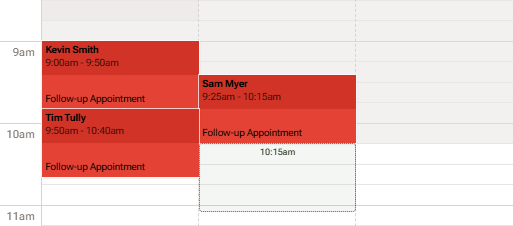
The previews are suggestions, not the only doors: click an opening or any empty slot and the booking window opens with the type and time filled in. Esc, or the ✕ on the chip, exits.
Step 9: Move Appointments Between Rooms
Drag an appointment sideways within the same day to move it to another room. The preview narrows to a single lane as you drag, and the appointment stays where you drop it.
Click in a lane to book into that room. Click the empty Room 2 lane at 2pm and the new-appointment window opens set to Room 2.
Appointments stick to their lane: dragging one into an overlapping time won't shuffle the others, so the layout stays predictable.
Step 10: Take One Room Out for a Day
If a room is out of action — a broken heater, a leak, a room borrowed for something else — click in that room's lane and create an unavailable block.
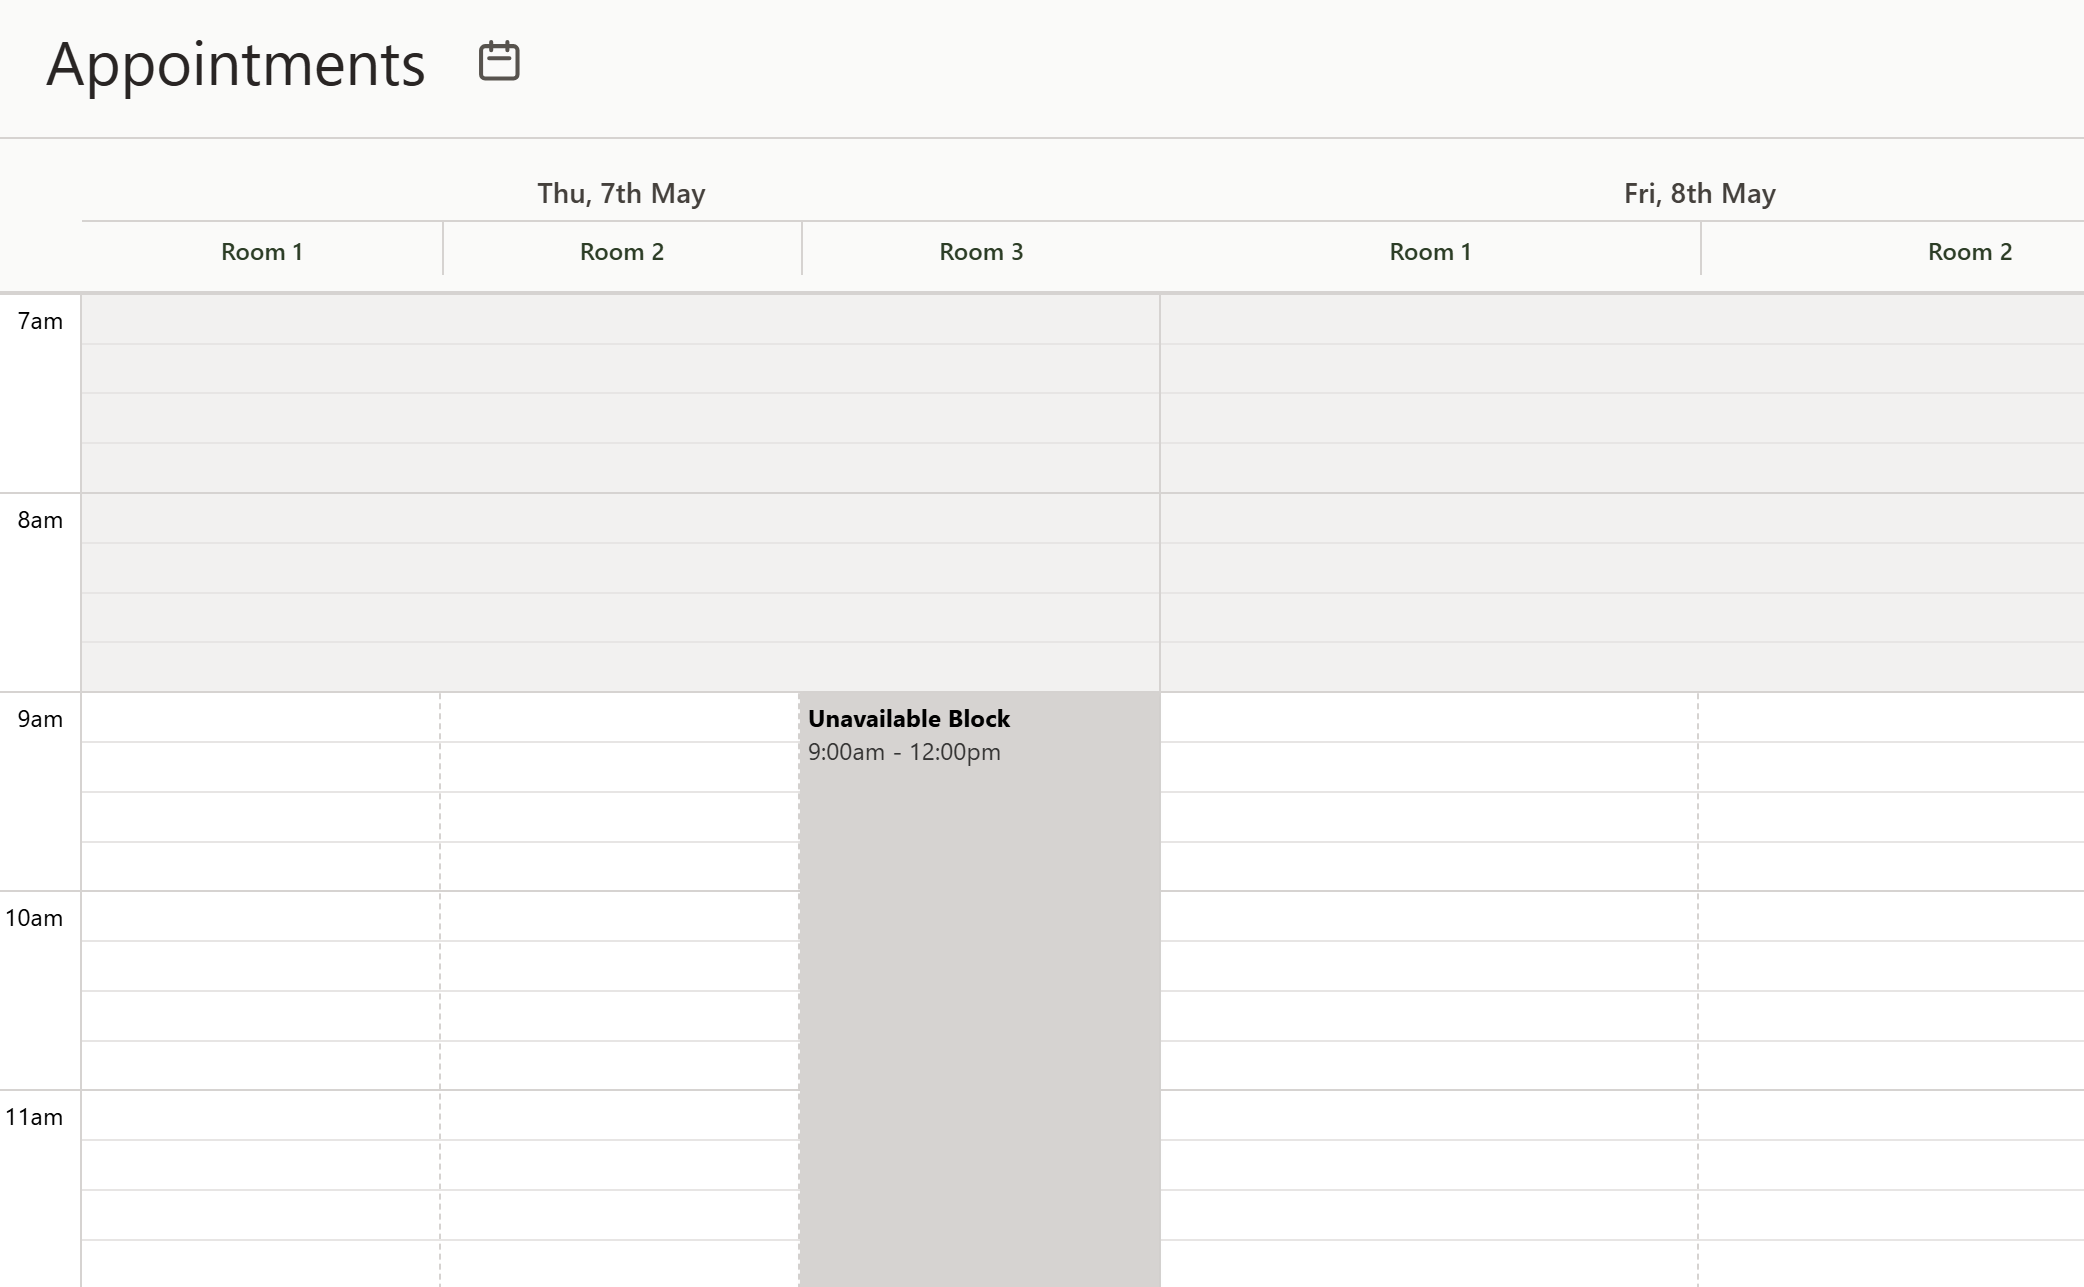
Daobook treats the block as occupying that one room, so online booking drops by one room for that time — as though you'd reduced the day's Rooms count for those hours. Drop two blocks at the same time to claim two rooms.
This is different from a break. A break takes you away — no bookings in any room. An unavailable block takes one room away; the others stay bookable.
Room hours vs. an unavailable block: Room hours (Step 2) is the set-and-forget way to say a room is only open certain hours every week; an unavailable block is the one-off way to pull a room out on a specific day.
What It Doesn't Do
Room hire. Daobook manages your time and your practitioners' time, not rooms as rentable assets. It can't offer full-day or half-day hire sessions with changeover gaps, or a separate calendar per room for outside tenants.
Two practitioners sharing one physical room. Rooms are set per practitioner, so Daobook doesn't know that your Room 2 and a colleague's Room 1 are the same space — left alone, it would let both be booked at once. Two ways to keep them apart:
- Split it by time with Room hours (Step 2). One practitioner has the shared room mornings, the other afternoons: give each their half of the day. Outside their window the room greys out and online booking won't place anyone in it.
- Claim it with an unavailable block (Step 10). For occasional sharing, whoever has the room drops a block at that time in the shared room's lane on the other practitioner's calendar.
Tips
- Defaults keep the old behaviour. Rooms defaults to 1 and hands-on time to blank on every existing practitioner and type. Change nothing and the calendar and online booking work exactly as before.
- Reducing the room count leaves existing bookings alone. Drop from 3 rooms to 2 with three concurrent bookings on the books and they stay put; only future online bookings respect the new count.
- Rooms not filling online? Check the numbers against Choosing Numbers That Stack. A hands-on time over half the appointment length can't overlap at all.
- There's no buffer setting. The needle-out moment at the end of each appointment is protected automatically — online booking never lets another client's hands-on window swallow the minutes you step back in to take needles out.
- Grey means closed, tint means hands-on. A grey lane can't be booked online; a tinted lane can, it just isn't a start you'd choose.