
Setting Up Your Brother Label Printer (Windows)
A step-by-step guide to setting up the Brother QL-810W label printer on Windows and printing your first prescription label from Daobook.
Setting Up Your Brother Label Printer (Windows)
This guide walks you through setting up the Brother QL-810W label printer on your Windows PC and Daobook. From unboxing to printing your first prescription label, you'll be up and running in about 15 minutes.
What You Need
- Brother QL-810W label printer — from around $216.95 AUD. We've found the best price at Inkstation
- DK-11202 labels (62×100mm) — third-party compatible rolls work fine and are much cheaper. Compatible labels from Inkstation
- (Optional) DK-11208 labels (38×90mm) — only if you dispense pre-made patent products (teapills, tablets, capsules). See "A Smaller Label for Patent Products" near the end of this guide
- A Windows PC with WiFi
- USB cable — the printer includes one in the box. Even though the QL-810W is a wireless printer, a USB cable is required for the initial setup
Step 1: Unbox and Power On
Take the printer out of the box and plug it in. The printer comes with a starter roll of labels, but these won't be the right size — you'll want to load your DK-11202 (62×100mm) labels before printing. Power on the printer using the button on the front.
Step 2: Download the Installer
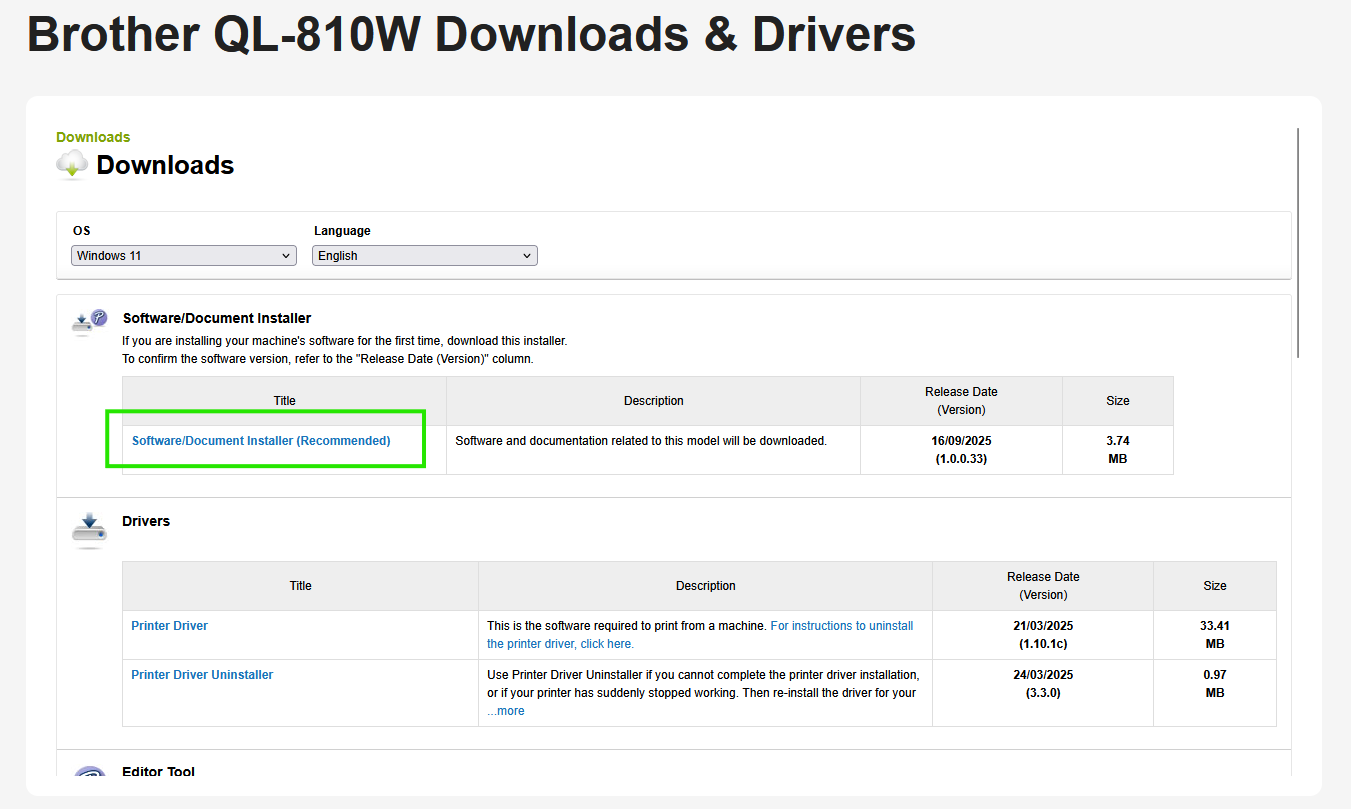
Visit the Brother QL-810W Downloads & Drivers page. Select your Windows version from the OS dropdown and click OK.
At the top of the page, under Software/Document Installer, click Software/Document Installer (Recommended), then click Agree to the EULA and Download.
Step 3: Run the Installer
Open the downloaded file. You'll be presented with a License Agreement — click Agree to continue.
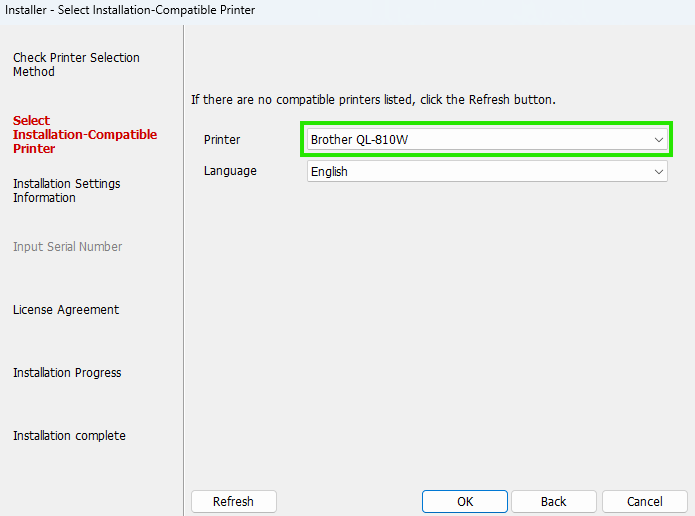
The first step is Check Printer Selection Method. Turn on your printer, connect it to your computer with the USB cable, then click Auto Select.

The installer will detect your printer and show Brother QL-810W pre-selected in the dropdown. Click OK.
Step 4: Install Software
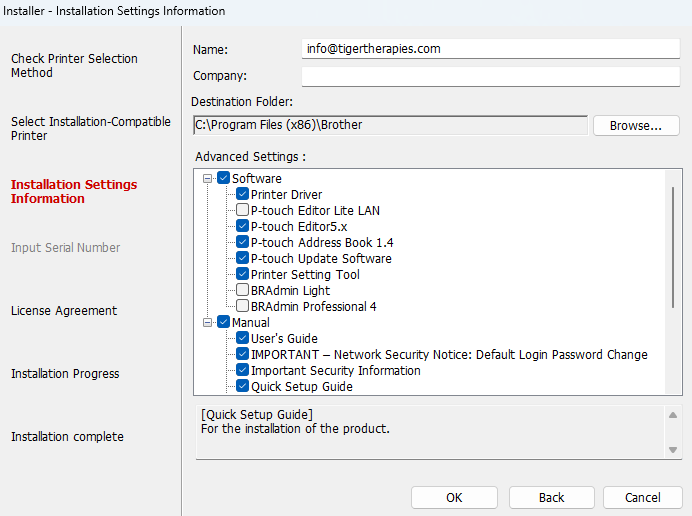
Next you'll see the installation settings with a list of software to install — drivers, P-touch Editor, and other utilities. You can leave the defaults as-is and click OK. The P-touch Editor software won't be needed for Daobook labels, but it won't hurt to have it installed.
Accept the next License Agreement and the installer will begin installing the printer driver and everything it needs.
Step 5: Set Up Wireless Connection
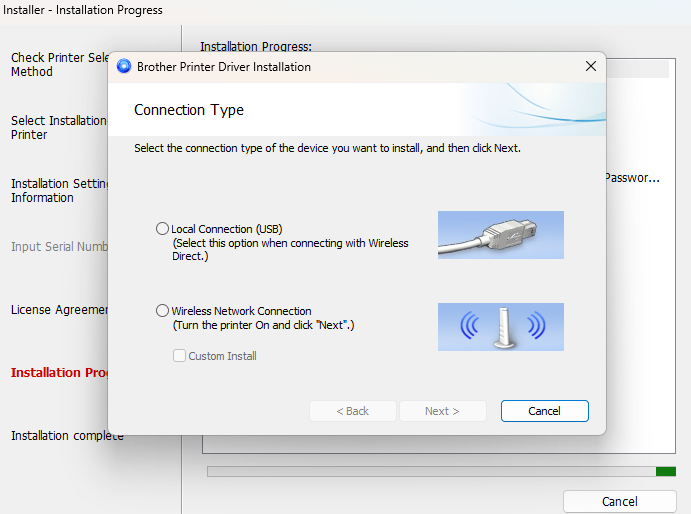
During installation, a prompt will appear asking you to select a Connection Type. Select Wireless Network Connection and click Next.
Next, the installer will search for your printer on the network. Select the Brother QL-810W from the list and click Next.
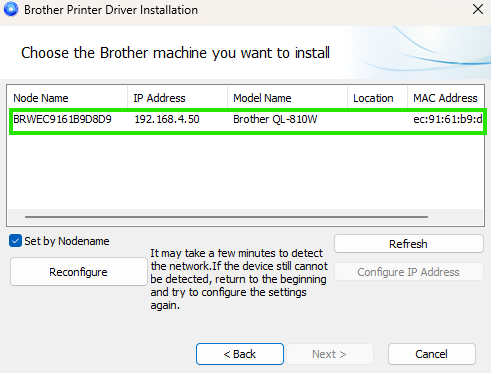
The installation will complete. Click through to exit the wizard, then unplug the USB cable and put it away — you can now print wirelessly.
Step 6: Verify Installation and Set Default Settings
Open the Windows Start menu, search for Printers, and click Printers & Scanners. Verify that the Brother QL-810W appears under the printer list.
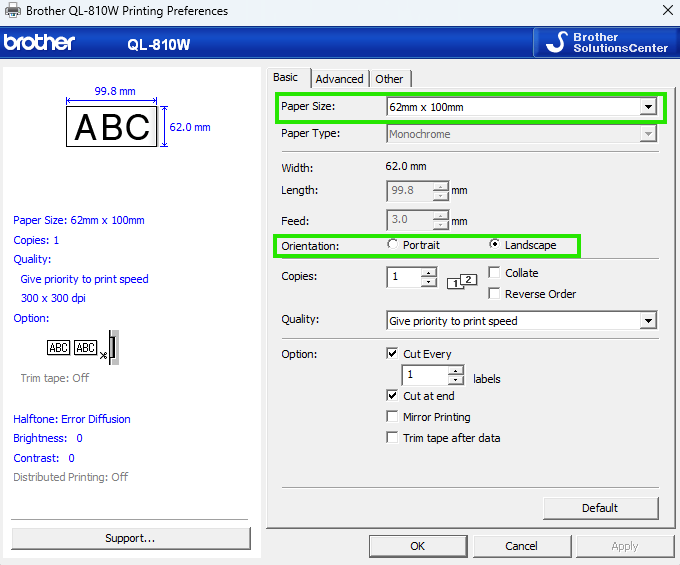
Click the printer, then click Printing Preferences. Ensure that:
- Paper Size is set to 62mm x 100mm
- Orientation is set to Landscape
Click OK to save.
Step 7: Set Your Printer in Daobook
- Click Print in the Daobook sidebar menu
- You'll see the Printer Settings section at the top of the page
- Under Printer Brand, select Brother
- Under Printer Model, select QL-810W
- The label size will show as 62x100mm — this matches the DK-11202 labels
- Your preference saves automatically
Step 8: Print Your First Label
- Find a prescription in the list on the Print page
- Click the Print dropdown button next to it
- Select Single Label (Front Only) or Double Label (Front & Back) depending on what you need
- A label preview will appear in a modal window
- Click Print Label — this will open the label as a PDF in your browser
- Press Ctrl + P (or go to File > Print) to open the print dialog
- Select the Brother QL-810W as your printer
- The paper size and orientation should already be set correctly from Step 6
- Click Print
Your label should print and auto-cut within a few seconds.
Optional: A Smaller Label for Patent Products
Pre-made patent products (teapills, tablets, capsules) already list their ingredients on the manufacturer's box, so they don't need the full-size label's herb-composition table. Daobook can print these on a smaller, neater 38×90mm dispensing label instead — the same one practitioners use to wrap a teapill bottle.
- Buy DK-11208 labels (38×90mm). They run on the same QL-810W printer — third-party compatible rolls work fine, just look for DK-11208 (sometimes listed as DK-1208).
- In Daobook, open Print → Printer Settings and set Patent & product label size to Compact — 38×90mm (DK-11208). Your preference saves automatically.
- Custom herbal formula labels always print on the standard 62×100mm label, since they carry the full herb-composition table. Keep both rolls handy and load whichever matches what you're printing.
- When printing a product label, load the 38×90mm roll, then set Paper Size to 38mm x 90mm in the printer's Printing Preferences (the same place you set 62mm x 100mm in Step 6) before printing.
Tips
- Third-party DK-11202 compatible rolls are significantly cheaper than Brother branded ones and work just as well
- The printer auto-cuts each label after printing — no scissors needed
- If labels aren't printing correctly, double-check that Paper Size is set to 62mm x 100mm and Orientation is set to Landscape in Printing Preferences (Step 6)
- Dispensing pre-made patent products? The smaller 38×90mm label (DK-11208) prints a tidier dispensing label — see "A Smaller Label for Patent Products" above